
DIY UV DTF transfer opens up a fun, at-home option for applying vibrant, durable designs to garments. This approach blends digital design flexibility with UV-cured inks and direct-to-film workflows, yielding crisp color and strong wash-fastness. From beginners to hobbyists, understanding the essential tools, like UV DTF transfer tools and a reliable DTF printer setup, helps you start confidently. In this guide, we cover costs, beginner DTF tips, and practical steps so you can estimate DTF transfer costs and plan your project. With clear guidance on materials, workflows, and troubleshooting, you can move from idea to finished transfer in your own workspace.
Seen from a home workshop perspective, this is a direct-to-film process that uses UV-curable inks to deliver bold colors on fabrics. Artwork is prepared digitally, printed onto a specialty film, then transferred to textiles with heat and pressure. If you’re budgeting or choosing gear, consider variations like UV DTF transfer tools, DTF printer setup, and DTF transfer costs as you compare options. As you gain experience, you’ll refine color management, underbase decisions, and post-transfer care to achieve durable finishes.
DIY UV DTF Transfer: Understanding the Basics
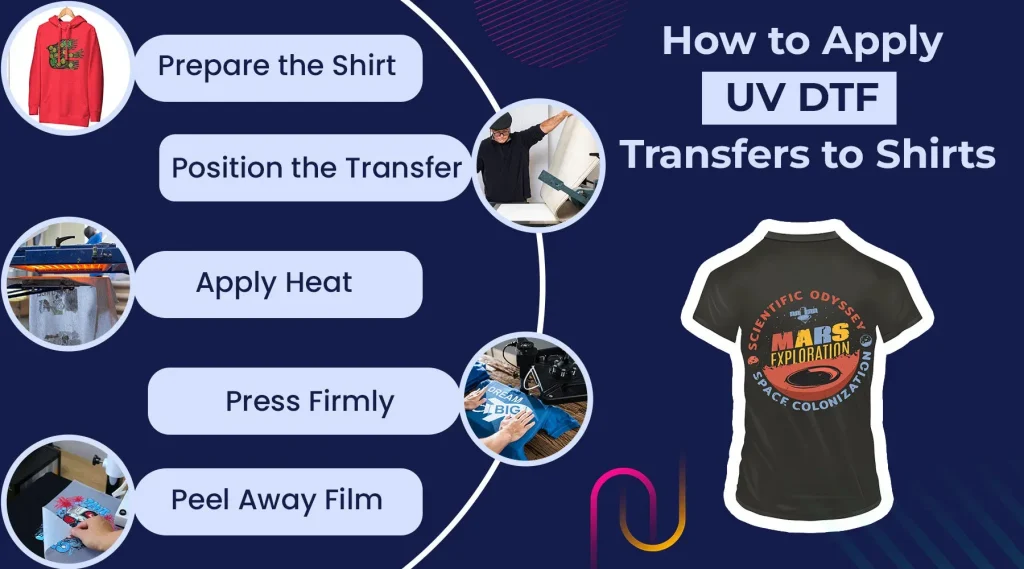
DIY UV DTF transfer blends digital design with UV-cured inks and the direct-to-film workflow. This at-home method lets you create vibrant, durable designs for garments and other substrates without a full pro studio. For beginners, start by understanding the core concept: you print onto a special film, cure the ink with UV light, and then transfer with heat and pressure to your chosen substrate.
Compared with traditional heat transfer, UV DTF transfers can offer sharper color, better wash-fastness, and compatibility with a wider range of fabrics. This makes it appealing for hobbyists, crafters, and small businesses looking to achieve professional results without large studio equipment. As you learn, you’ll also encounter related considerations such as DTF transfer costs and the role of reliable DTF transfer tools in consistency.
Essential Tools and Materials for Your DTF Kit
A basic kit includes a printing device capable of handling DTF film, a white underbase option if you work on dark fabrics, DTF film sheets, a heat press or UV curing setup, suitable substrates, and design software. These core items form the foundation of your DTF workflow and set the stage for quality results.
Supplementary tools like weeding tools, scrapers, cutting mats, and a clean, organized workspace are essential for precision and efficiency. Protective gear and a dedicated workstation help keep your process safe and consistent, while selecting the right tools should align with your goals and budget, including considerations of DTF printer setup and compatibility with your preferred inks.
DTF Transfer Costs and Budgeting: Planning Your Investment
Initial equipment costs can vary from entry-level bundles to more capable UV-capable printers, depending on print size and features. Plan for recurring expenses such as white and color inks, DTF film, and replacement parts, and estimate monthly usage to avoid stockouts. Understanding these components helps you forecast the overall investment, including ongoing DTF transfer costs.
A lean budgeting approach works well: start with a focused project plan (for example, T-shirts and tote bags), track expenses for a few months, and scale as demand grows. Being mindful of the DTF transfer tools you choose—prioritizing reliability and consumable life—can reduce downtime and improve cost efficiency over time.
Beginner DTF Tips: Quick Wins for Great Results
Design with practical constraints in mind. For darker fabrics, plan a white underbase and test color balance with small prints before committing to full runs. This is where beginner DTF tips come into play: use test prints to verify alignment, color accuracy, and the effectiveness of your underbase.
Lock in simple workflow improvements: standardize print and cure times, keep consistent temperature and pressure settings, and take notes on each run. Small adjustments—like minor tweaks to ink density or curing duration—can yield noticeably crisper details, longer durability, and a more repeatable process.
DTF Printer Setup: Calibration, Color Management, and Workflow
DTF printer setup involves selecting the right film and inks, ensuring proper white ink flow if used, and configuring print profiles to achieve vibrant, accurate colors. Calibration of printer alignment, nozzle checks, and color profiles is critical to minimize misprints and deliver consistent results across batches.
Develop a reliable workflow by running regular test patterns, verifying alignment, and adjusting profiles for different fabrics. Once the printer is properly configured, you can scale up to longer production runs with greater confidence, knowing that color management and substrate pairing are optimized.
Troubleshooting, Safety, and Maintenance for DIY DTF Transfers
Common issues include faded colors on dark fabrics, bleeding, or edge blur. Address these by confirming the white underbase strength, ensuring proper film loading, and verifying curing accuracy. Keeping a log of settings and outcomes helps you quickly diagnose recurring problems.
Maintenance and safety are essential for longevity. Regularly clean printer heads and film paths, store films away from heat and direct light, and inspect your heat press for even heat distribution. Use PPE, like heat-resistant gloves, and maintain an organized workspace to reduce accidents and extend the life of your DTF transfer tools.
Frequently Asked Questions
What is DIY UV DTF transfer, and how does it work?
DIY UV DTF transfer is a print-to-film method that uses UV-curable inks. You print your design on a specialized DTF film, cure the ink with UV light, and then transfer the image to fabric with heat and pressure. This approach delivers vibrant colors, sharp details, and durability, all within a compact home workspace.
Which UV DTF transfer tools are essential for beginners?
Essential UV DTF transfer tools for beginners include a DTF printer setup (or an inkjet with white ink), DTF film and transfer sheets, a white underbase capability, a heat press (or a UV curing light for UV workflows), suitable substrates, and design software. You’ll also want weeding tools and a clean, organized workspace to support accurate transfers.
How much should I budget for DTF transfer costs when starting at home?
DTF transfer costs involve upfront equipment, inks and film, and ongoing consumables. Entry-level printers and white ink plus film can start from the hundreds to several thousand dollars, depending on features. Plan for a heat press, replacement parts, and per-transfer consumables to estimate ongoing costs and profitability.
What beginner DTF tips can help ensure successful DIY UV DTF transfer results?
Beginner DTF tips include designing with a white underbase for dark fabrics, starting with test prints, ensuring precise alignment, and calibrating curing and heat times. Maintain consistent printer settings and a simple workflow to build confidence. These beginner DTF tips help you achieve repeatable, professional-looking DIY UV DTF transfers.
How should I approach DTF printer setup for DIY UV DTF transfer to get reliable results?
DTF printer setup should prioritize compatible hardware, proper white ink handling, correct film feeding, and accurate driver and color profile settings. Ensure the printer is calibrated for color and alignment, and pair it with a reliable curing or heat-transfer method. A solid DTF printer setup reduces misprints and speeds up production.
What are common issues when making DIY UV DTF transfer and how can I troubleshoot them?
Common issues include faded colors on dark fabrics, bleeding or blurry edges, peeling after transfer, and inconsistent results between runs. Troubleshoot by verifying the white underbase, checking heat and pressure, ensuring proper film alignment, and allowing adequate cooling and cure time. With careful troubleshooting you can improve color accuracy, durability, and overall results for your DIY UV DTF transfer projects.
| Aspect | Key Points |
|---|---|
| Overview},{ |
Summary
DIY UV DTF transfer is a creative, at-home method for turning designs into vibrant, durable finishes on garments and other items. This guide summarizes the essentials of DIY UV DTF transfer—from the right tools and materials to budgeting, a beginner-friendly workflow, troubleshooting tips, and maintenance—so you can confidently start making professional-looking transfers in your own workspace. With a focused setup, careful planning, and practice, you can scale your projects and build a reliable home-based process for producing high-quality transfers.